While the refractometer only started gaining popularity in the dairy industry in recent years, the technology itself dates back to 1869. It has been used since in chemistry and food sciences to analyze solutions and purity of substances. On today’s dairies, we use refractometers in three main ways:

1. To test the quality of the colostrum to determine whether the immunity content is sufficient for first newborn feeding
2. To test solids in waste milk to determine how much milk balancer will be needed to maintain the correct and consistent nutrition or to confirm that our calf milk replacer was reconstituted to the desired level of nutrition
3. To test blood serum total protein (BSTP) to determine if the passive immunity transfer from colostrum was successful
1. Choose the right tool
Refractometers are available in three main forms: digital dip-style, digital well-style and optical. Each model works a bit differently, so pick the one that goes well with the protocols on your dairy.
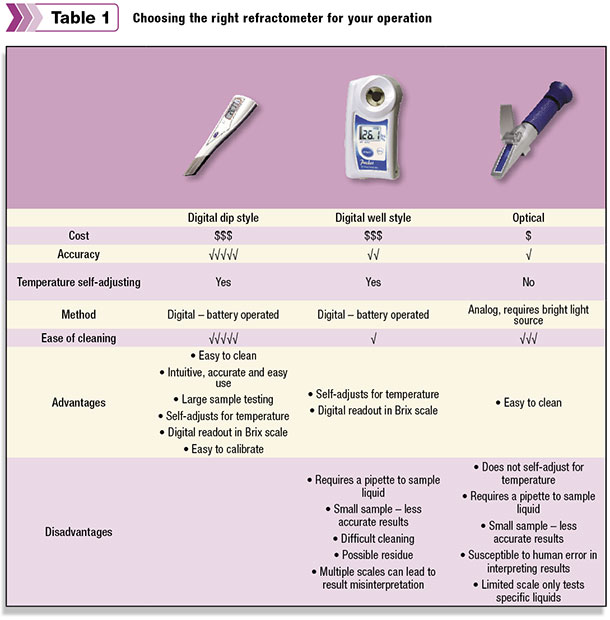
The digital dip-style refractometer is the newest in technology, design and user interface. Comparable in price with a well-style refractometer, the dip-style is more intuitive to use. Simply dip it in the sampled liquid, press start and, within seconds, read the digital display results.
This testing method allows for a more accurate result, as no pipette sample is required. The prism is mounted flush with stainless-steel casing, making it easy and quick to clean, further ensuring accurate results.
The digital well-style refractometer has been in the marketplace for a while. Comparable in price with a dip-style, it uses a well-style testing area. This design feature requires each liquid to be sampled with a pipette and be dripped into the well for testing.
Results are displayed on a digital screen. As the “well” is recessed, additional attention during the cleaning process is required. The well must be fully dried between samples to prevent incorrect results.
Proper cleaning of the pipette is also critical to the process, as retained water will dilute the sample. This is a more complicated process, so proper training for sampling and cleaning methods is essential in order to prevent incorrect results.
The optical refractometer is a very basic tool, no batteries required to operate; the instrument relies on full sunlight or a bright light bulb for operation. The oldest style, it requires a sample to be at room temperature.
Sample the liquid with a pipette and place on the prism, wait for a minute or two and look into the light at a scale, read the results at the contrast line between white and blue. The pipette in this case is the same weak link as in the well-style case. While the optical refractometer is financially more affordable than the other options, the results will not be as precise as with the digital refractometers; you are also more likely to have false positives and false negatives due to user error.
2. Set your protocols
The tool is only as successful as your protocols make it. Ensure that your protocols clearly explain when to use the refractometer and what to do with the information it provides. Train your employees on when, how and why the refractometer is to be used.
Clearly set the standards for what quality is to be fed to which animals. Make sure all of the information is written down so you can analyze it later.
For example: Use a refractometer to test colostrum after each collection. Clearly label the container with the results. All colostrum above 22.0 percent can be used for heifers on first feeding.
Any extra colostrum above 22.0 percent shall be frozen in labeled containers. (The minimum recommended first feeding is at least four liters/quarts of colostrum with at least 50 Immunoglobulin G’s each, which is equal to 22.0 percent on the refractometer Brix scale.)
3. Clean, clean, clean
Refractometers, whether optical or digital, measure the refractive index of a medium. Let’s use colostrum as an example. The refractive index is a ratio of the speed of light in a vacuum to the speed of light in colostrum.
As with any optics, the prism through which we are measuring must be completely clean and without scratches in order to be accurate. It is extremely important to properly clean your refractometer after each use.
First, wash the prism with hot soapy water (110 to 120ºF) to break through any fats and proteins. Then, wipe with a soft, clean, lint-free cloth. In the case of the well-style refractometer, use a cotton swab to ensure all areas of the well were reached, cleaned and dried.
Finally, store in a safe place. Refractometers typically come with padded cases for storage, so keep those close to your testing area and keep your refractometer inside to prevent accidental damage.
4. Calibrate
Calibrating is the first step in getting accurate results. While the need for calibration depends on frequency of use, you should calibrate at least at the beginning of each day you’ll be testing. The exception is testing for BSTP. The scale for BSTP is a lot tighter, and even a small offset could mean the difference between a pass or fail. Therefore, you should always calibrate before testing BSTP samples.
Before starting calibration, examine the refractometer prism for cleanliness and any scrapes or cracks. Especially watch out for protein or fat residues; those will create false positives and offset your calibration. If the prism is smooth and clean, you can begin calibration.
Prepare clean, ideally distilled, water – but if that’s not available to you, use bottled drinking water. The commercially available bottled water are typically filtered using reverse osmosis, thus removing impurities and making it suitable for calibration.
Digital refractometers are calibrating by either dipping the prism in the water or placing water in the well and then pressing the “zero” button. A fairly simple process.
An optical refractometer is a bit more complicated and requires adequate light for calibration. Place the water on the prism, ensuring the entire prism is covered, then lower the plastic shield.
Hold the refractometer up to the light and look through the eyepiece. The contrast line, where white and blue meet, should be on the 0.0 line. If it is not, use the accompanying screwdriver to adjust the screw on the top of the refractometer.
5. Act on the results
Obtaining scientifically accurate results is great. But it is what you do with those results that makes them powerful. Use the results as part of our management techniques to improve your calfhood health. Here are a few examples how:
Example 1
Earlier, we set out a clear target for what quality of colostrum should be fed to heifers. At the end of the month, you can review the average and the median quality you receive from the animals in your herd. So, let’s say your dairy’s colostrum quality median of 23.0; this means that you can raise your target for first heifer feeding to 23.0 and know that you’ll have enough colostrum to satisfy that while raising a bar on the quality the heifers receive. In this manner, analyzing your results allows you to grow at your own pace instead of just sticking to the generic recommendations.
Example 2
The colostrum quality data is also a good way of identifying changes in your dry period protocols. It is also a great way of verifying that your dry period protocols are working the way you intended and can allow for you to modify them as needed to obtain best colostrum results.
Example 3
Poor results of BSTP are directly linked to your colostrum management protocols. Get a tool that allows you to test the blood serum protein right at your dairy, and test every calf. You will find out almost immediately if your colostrum protocols aren’t working and take immediate corrective action.
No matter which style of refractometer you use, it is a tool that, if used properly, will provide you with a lot of useful information and help you take your calf protocols to the next level. PD

-
Andy Beckel
- Golden Calf Company LLC
- Email Andy Beckel