A common malady we encounter when owning and operating farm trucks and equipment is fluid leaks. Today’s trucks and equipment are more sophisticated and complex than ever before.

More than once I’ve discovered a serious leak in one of the fluid systems – coolant, engine or hydraulic – of a farm truck or piece of equipment and grumbled that I should trade the piece of equipment for something newer.
Soon reality kicks in, and I realize that I am going to get dirty, but fixing the machine or truck is the practical solution. Although there are some leaks that are very formidable to repair – that require advanced training and a well-equipped shop – many can be repaired in the field or farmyard.
Locate the leak
The first task in repairing a fluid leak is to locate and identify the source. It is very important to be sure of the source before you purchase seals and gaskets only to find out they are not the ones you needed. Recently, I observed a bad oil leak coming from a Cummins engine. I took a quick look under the engine and observed a clean-shiny spot in one corner of the engine oil pan and saw oil pooling there.
I failed to clean all of the oil-coated surfaces and run the engine to watch for fresh oil. It wasn’t until I had already purchased an engine oil pan gasket and was cleaning the underside of the engine in preparation to replace this gasket that I noticed a significant amount of oil coming from higher on the side of the engine.
After cleaning the engine and running it at an idle, I discovered what the real source of the leak was: A worn-out seal in the vacuum pump. The oil had been dripping from the vacuum pump to the side of the engine at the corner of the engine oil pan, and the engine fan had been blowing the oil over much of the underside of the engine.
There are several good methods to use when cleaning components to locate leaks. There are many good engine degreasers available in aerosol cans that can be used in the shop or field. These products can be used by themselves with a towel or rag or in combination with water.
Steve Williams, the lead mechanic for Western Mechanical Repair in Ross, North Dakota, cautions, “Be careful not to direct high-pressure water or steam at seams or gaps between components where you suspect gasket or seal failure. You can force water into the internal side of systems, causing a whole different set of problems.”
Safety
Once you have cleaned the surfaces of the area where you suspect the leak to originate, start the engine and watch the suspected area for fresh fluid. It is important to be very careful at this step to use extreme caution and be aware of moving parts such as belts, fans, drive shafts, etc.
Many times, it is a good idea to have another person help you at this stage for safety reasons or simply to aid you in observing a leak in a system that requires operation to locate.
Hydraulic system leaks can require an observer if it is necessary to operate the system to see the source. The high-pressure side of these systems operates at several thousand pounds of pressure per square inch and can cause harm to an innocent observer.
You should always stand back at a safe distance that will allow you to see the system and wear safety glasses until you have an idea where the leak is.
An instance demonstrating the hazards of high-pressure fluids occurred some years back on Richardson Farms in Leadore, Idaho. Dave Richardson recounted to me the details of an accident that occurred while he and his young son Larry were trying to find and repair a hydraulic leak between the power-take-off (PTO) driven hydraulic pump and the hydraulic drive motor of a pull-type windrower.
“Larry was trying to help me find the leak. I had climbed into the tractor to start the PTO and did not realized that Larry put his finger on the high-pressure line where we thought that leak was. When I started the PTO, the stream of hydraulic oil blew up Larry’s index finger,” Dave says.
Dave went on to explain that it took several years and many surgeries to repair his 12-year-old son’s finger, and that Larry only regained approximately 75 percent of the use of that finger.
Repair
Once you have cleaned the area and located the leak, disassemble components to reach the failed seal or gasket. If you are making repairs in the field, and there is any chance that you may introduce wind-borne contaminants into the systems you are preparing to repair, create a windbreak using tarps, plywood, etc.
A few minutes spent blocking the wind may make the difference between a successful repair and a failure.
Hoses and oil lines are relatively easy to replace or repair. Any hoses or oil lines that are already leaking or have cracks or bulges should be replaced or repaired. The hoses in the cooling system do not operate under extreme pressure and can be removed and re-installed with low-pressure hose clamps.
While you may be able to cut a bad section of radiator hose out of the end and reattach it to finish a project, it is advisable to replace the hose as quickly as possible. It is very difficult to splice radiator hose and is inadvisable.
As with hoses in the coolant system, low-pressure fuel and oil lines (return lines) are not difficult to repair or replace. These lines are often attached with hose clamps or pressed band clamps. These rubber lines can be matched and replaced with similar material from your local auto-parts store.
High-pressure lines, such as fuel injection lines and hydraulic lines, are a different case. It is important to recognize the difference between these lines and systems. High-pressure fuel lines and oil lines are made of steel tubing or a rubber line with a steel braided core separating the inner rubber liner from the outer rubber jacket.
Due to the extreme heat and pressure these lines are subjected to, it is important to make sure you make repairs with the appropriate fittings and proper tubing or rubber line. Many parts stores can custom-make a high-pressure hydraulic line to meet the specs of the hose you have removed. Fuel injector lines can be brazed by an experienced welder.
Regarding seals, O-rings and gaskets, there are a few things to remember. First, be careful to disassemble components carefully in order to remember the order and manner in which they were originally assembled. Once you have taken the components apart, clean the inner workings where the seals, O-rings or gaskets seat. Be careful to wipe out any cleaner residue, as some parts cleaning agents will damage O-rings.
Look closely at the area where the gasket, O-ring or seal seats to make sure there is no scoring, rust or other blemish that will cause the seal to fail after replacement. If you do find damage to the seat, use more solvent and a bit of fine-grit sandpaper or a hone to remove rust or scoring from the surface where the seal is to seat.
After the parts are cleaned, reassemble the components installing the new seals, O-rings or gaskets. Some of these materials require a fine lubricant or sealing compound. Be sure to ask your supplier what is required for each type of seal, O-ring or gasket.
For instance, O-rings can be inserted into the seat easier using a light-clean grease, but some seals need to be inserted dry. Also, if you have to use a silicone sealant, be sure to use a sealant rated for the proper temperature, oil, gear lube, coolant, etc., for the application. One final note regarding seals: Because seals can bind as you push them into the housing, use a socket or piece of pipe just slightly smaller than the diameter of the housing to ensure that you can push them into the seat squarely.
Once you are done reassembling the components, run the truck or equipment and check for leaks. ![]()
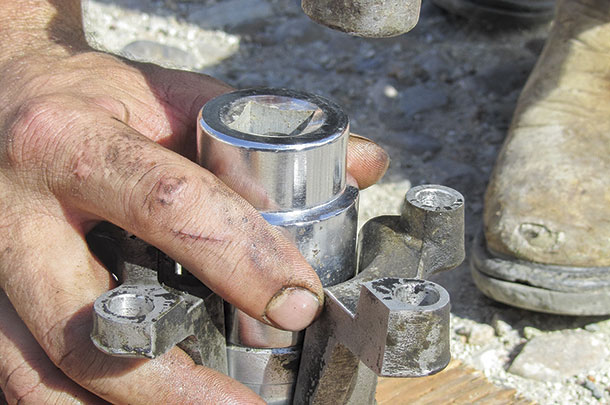
PHOTO 1: A 15/16-inch socket is used to drive shaft-seal housing out of a vacuum pump body of a 5.9 Cummins engine.
PHOTO 2: A 1½-inch socket is used to seat a shaft-seal housing in a vacuum pump body. Photos by Michael Thomas.

-
Michael J. Thomas
- Freelancer, stock producer and farm mechanic
- Salmon, Idaho
- Email Michael J. Thomas