As the use of genomics has entered mainstream dairy production, lots of attention has been focused on the science, technology, predictability and economics of genomic testing.

But all the benefits the latest advancements in high-tech dairy genomics have to offer to dairymen rely entirely on a critical, and decidedly low-tech, first step: the collection of an adequate DNA sample on the farm.
This article will provide a quick overview of DNA sampling alternatives, with the benefits and limitations of each. It will also address sample identification recording, Council on Dairy Cattle Breeding (CDCB) nomination data requirements, the best time to test your animals and overall genomic testing expenses (including the cost of the test itself).
These expenses need to be evaluated along with the cost of labor, the sample collection device and data submission that is part of genomic sampling. Ultimately, the quality of your genomic results depends largely on the DNA sample provided to the testing laboratory, and as we often say in the genomic testing laboratory – a bad sample usually leads to a bad result!
Sample types and procedures
A variety of sample types can be submitted for genomic testing, including tissue, hair, blood or semen.
Tissue sampling using a device such as an Allflex Tissue Sampling Unit (TSU) is a quick and efficient method for sampling a large number of heifers. The benefits of this sampling method include:
- Dairymen are familiar with the applicator devices used to take the sample
- The device takes an appropriate sample for genomic testing
- The 2D barcode on the tissue sample collector is useful for simple sample identification recording
Many laboratories offer discounts for tissue samples since they are part of a process that can be automated in the laboratory.
On the farm, tools are available that allow the individual doing the sampling to read an animal’s electronic I.D. with a wand, then scan the barcode to match the animal and sample I.D. — a critical part of the process. The TSU costs about $1.75 to $2 each, but may be incorporated into the test cost if a sufficient number of samples are submitted.
Taking a tissue sample is an easy process. Simply load the applicator with a fresh TSU, take a tissue sample from the ear and unload the applicator. If sampling has been successful, you will be able to visually see the tissue sample inside the vial.
If you wish to re-test the animal at a later point in life, the tissue sampling unit is not necessarily the best device, since the only way to retain the sample is to save the extracted DNA.
Alternatives to tissue sampling include a hair or blood sampling. Hair and blood sampling involve the use of a paper card — usually supplied by the genomics testing lab — that is inexpensive and easy to use, but somewhat less automated than the tissue sampling unit. A barcode is present on each card which can be scanned, and like the TSU, linked to an animal I.D.
The cost of the card is about 50 cents and one distinct advantage to this sampling method is the ability to return to that sample later in the animal’s life and re-extract the DNA for another test (something which is done frequently on the part of the A.I. industry, for example).
Recording a sample
Whether the sample is from tissue or another source, recording it involves associating an identification number for the animal with the identification number of the sample, and is arguably the most important part of the process — though seldom recognized as such.
More than half of the focus for development of efficient sample collection systems is around the process of associating the sample barcode with the animal’s permanent I.D. to ensure “chain of custody” — like a crime scene investigation.
 The sample barcode is the vital piece of information from the lab perspective, but in the end, the information must be related to the animal I.D. to be useful for the dairyman. Sample identification and animal I.D. recording can be done by hand, however, this method can be time-consuming and lead to transcription errors.
Handheld devices with built-in scanners can be helpful to automate the recording process. Depending on the data management system available, it may be possible to add a barcode scanner directly to the RFID reader and handheld device.
Data requirements for CDCB nomination
To get a successful result from the genomic evaluation provided by the CDCB, you must not only submit a sample suitable for successful genotyping, but also include information on the animal.
Required data includes an acceptable and unique animal identification (registration number or electronic I.D. tag number), breed designation, birthdate, sex, sire and dam, and whether or not the animal is a twin or a singleton.
In most instances, this data can be routinely retrieved from commonly used record systems and uploaded to the genomic services provider where your samples are sent. If that isn’t possible, a simple electronic spreadsheet can be sent via email.
When to sample
People often ask us: “When is the best time to sample?” Our answer is always this: When the animal is in the chute or crate! The opportune time to sample can depend on circumstances on your operation, but it always revolves around that time when an animal is restrained and it is safe for someone to take the sample.
Most dairies will want to sample young animals because of ease of collection, and so that a management decision can be made early in life — before a significant investment in the animal.
However, depending on calf mortality at your farm, it will be financially beneficial to wait until you can feel confident in that calf’s survival. In other instances, you may want to screen for diseases, such as animals persistently infected with bovine viral diarrhea (BVD-PI), before investing in the cost of genomic testing.
One strategy that has been proposed is to sample a heifer at or shortly after birth, screen the sample immediately for BVD-PI and hold the sample for several months while the heifer gets through the critical health period in the first few months of life.
If, at 8 to 12 weeks of age, the heifer is screened free of BVD and appears to be thriving, then proceed with genomic testing and decide from there what your strategy will be for retention, sale and breeding.
Producers can choose matched pair sets that can be utilized to take a tissue sample at the same time as tagging is done with a visual ID or RFID.
These matched pair sets can include any combination of a tissue sample and RFID button or visual tag. These sets make a great option because labor is minimized by tagging and tissue sampling at the same time and accuracy increases since the tissue sample and tag come as a matched set.
Summary
Overall, the genomic sampling process is dependent on each farm and each farm’s practices. Various sampling procedures exist that balance ease of collection, efficiency of linking barcode ID to animal ID for chain of custody, utility of the sample for efficiency of laboratory testing and objectives for repeat testing or long-term storage.
Whatever you do, you want a quality sample to be collected because like most things in life, the quality of your finished product depends on the quality of the materials used to produce that product.
A bit of time spent upfront to find a sample collection procedure that works for your operation will ensure you get the best possible return on your investment in labor and testing costs. PD
Stewart Bauck is a veterinarian and the manager of GeneSeek, the genomics division of Neogen Corporation.
PHOTO 1: A sample can be easily taken from the ear using a tissue sampling unit with this tag applicator.
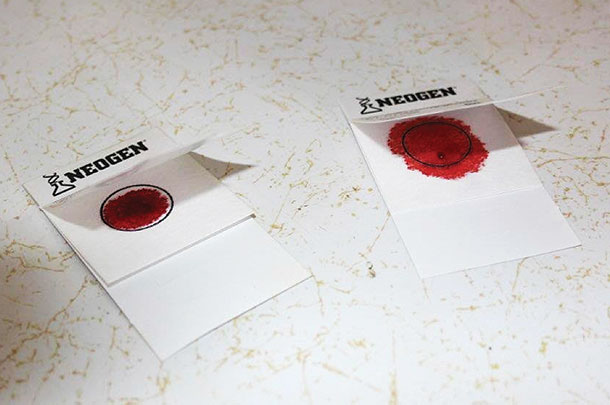
PHOTO 2: Blood cards drying after sample collection. Photos provided by Neogen.