Photo by Peggy Coffeen.
 From the kitchen of: Peggy Coffeen
editor, Progressive Dairyman
This recipe has become a favorite among family and friends. There’s no baking involved, and it goes together quickly and easily. Sneaking ice cream into the filling layer delivers an extra creamy texture, while packing an even bigger punch of dairy ingredients.
Butterfinger Ice Cream Torte
Ingredients:
Crust:
1 package (10 ounces) vanilla wafers, crushed (3 cups crumbs)
1/2 cup butter, melted
Filling:
1 cup cold milk
2 packages (3.4 ounces each) instant vanilla pudding mix
1 quart vanilla ice cream, softened
Topping:
1 carton (8 ounces) frozen whipped topping, thawed, or real whipped cream
3 large Butterfinger candy bars, chopped
Directions:
In a small bowl, combine cookie crumbs and butter. Press into a 9-by-13-inch dish; refrigerate.
In a bowl, whisk milk and pudding mixes for 2 minutes. Fold in ice cream. Spread over crust.
Top with whipped topping. Cover and refrigerate for at least 2 hours. Sprinkle with crushed candy bars before serving.
Yield: 12 to 15 servings
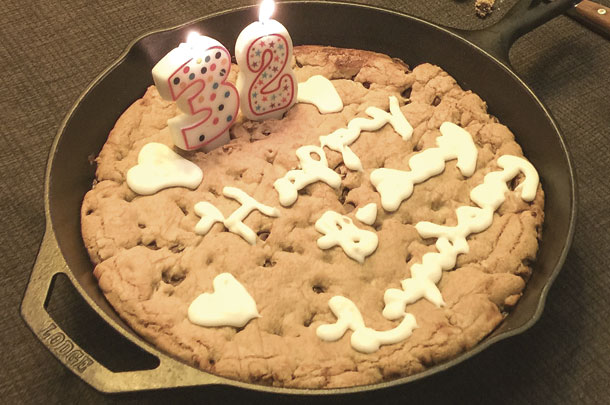
Photo by Emily Gwin.
 From the kitchen of: Emily Gwin,
editor, Progressive Dairyman
My husband and I hosted a last-minute New Year’s Eve party this past year, and I needed a very low-key dessert. I was a bit intimidated at this recipe’s use of browned butter, but I love baking in my 12-inch cast-iron skillet and, other than the second step that involved mixing and resting, this recipe seemed pretty simple. One of the guests had a recent birthday, so I mixed up a quick cream cheese icing and “decorated” (I use that term very loosely) with makeshift piping from a plastic bag.
It exceeded my expectations, and I was surprised at how much flavor the browned butter added to the dessert. I like it so much I’m planning a “milk and cookies” theme party for my daughter’s second birthday, and I’m going to make this instead of buying a cake.
Browned Butter Chocolate Chip Skillet Cookie
Prep time: 10 minutes
Cook time: 20 minutes
Total time: 30 minutes
Author: Natalie,
Life Made Simple
Yield: 1 large cookie
Ingredients:
12 tablespoons (1 1/2 sticks) unsalted butter, divided
1/2 cup granulated sugar
3/4 cup brown sugar, packed
1 egg + 1 egg yolk
2 1/2 teaspoons vanilla extract
1 3/4 cup all-purpose flour
1 teaspoon salt
1/2 teaspoon baking soda
1 cup semi-sweet chocolate chips
1/2 cup bittersweet chocolate chunks
Directions:
Preheat oven to 375ºF.
In a small saucepan set over medium heat, add 8 tablespoons of butter. Heat until the butter foams, then begins to brown and become speckled (about 3 to 5 minutes). Remove from the heat and pour into a medium-size mixing bowl along with the remaining butter. Stir until all of the butter has melted. Add the sugars, egg, egg yolk and vanilla. Beat the mixture for 30 seconds, then let rest for 30 seconds. Repeat 3 times.
In a small mixing bowl, whisk together the flour, salt and baking soda. Using a spatula or wooden spoon, stir in the dry ingredients. Fold in the chocolate chips and chocolate chunks, then press into a 10- to 12-inch cast iron skillet, creating an even layer.
Place in oven and bake until the center is set, about 20 to 25 minutes. Just remember, with a cast-iron skillet the cookie will continue to bake a little as it cools. Remove from the oven and allow to cool for 10 to 15 minutes before slicing and serving.
Notes: I like to use either Ghirardelli or Scharffen Berger chocolate. They make quality chips, bars and chunks.
Recipe source: Adapted from Marin Mama Cooks
 From the kitchen of: Janet Goffin,
advertising representative, Progressive Publishing
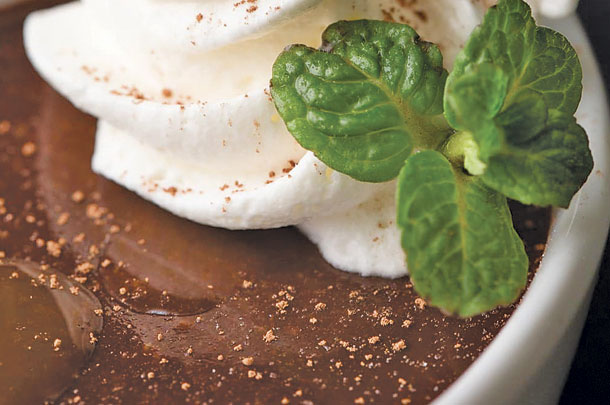
This is very rich and very easy to make. My grandsons call this “the chocolate dream stuff.”
Blender Chocolate Pots de Creme
Prep time: 5 minutes
Cook time: 2 minutes
Total time: 7 minutes
Servings: 6
Ingredients:
6 ounces semi-sweet chocolate chips
2 tablespoons sugar
1 large egg
1 teaspoon pure vanilla extract
A pinch of sea salt or kosher salt
1/2 cup plus 2 tablespoons heavy cream or half-and-half
Cocoa powder for garnish, if desired
Whipped cream for garnish, if desired
Instructions:
Place 4 to 6 small bowls, pots, ramekins, etc. on a plate or pan.
Place chocolate chips, sugar, egg, vanilla and sea salt in a blender container. Pulse a few times to mix the ingredients. Remove center cap from the blender cover and place a small funnel into the opening.
Pour cream (or half-and-half) into a microwave-safe bowl. Make sure it’s a large enough bowl/cup, as mixture will bubble up when heated. Heat on high power for about 1.5 minutes, or until cream is vigorously boiling.
Turn blender on low speed and blend for 15 seconds. Slowly begin pouring the hot cream into the funnel. Once all cream has been added, place your hand on the funnel to keep it in place and increase blender speed to high. Blend for 1 minute, then pour into prepared bowls and refrigerate for 1 hour. Can be made two to three days in advance. Cover with plastic wrap when storing.
Serve with a dollop of whipped cream and dust it with a bit of cocoa powder, if desired. Garnish with a mint sprig.
 From the kitchen of: Melinda Amy
circulation team member, Progressive Publishing
I just love this recipe because it reminds me of home and my Grandma. It’s super-easy to make and a great way to use up milk and eggs.
Baked Custard
Recipe from Cleo Amy
Ingredients:
6 eggs
2/3 cup sugar
1/4 teaspoon salt
1 1/2 teaspoon vanilla
1 quart whole milk
Instructions:
Beat eggs, sugar, salt and vanilla.
Add to warm milk.
Heavily butter 2-quart baking dish (to prevent sticking), and pour mixture into dish.
Place baking dish into a cake pan with water (to make sure the custard cooks all the way through). Optional: Sprinkle with nutmeg before baking.
Bake at 325ºF for 40 to 50 minutes.
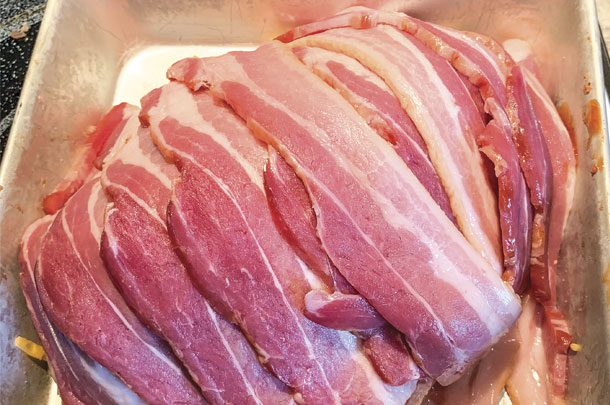
Photo by Ashley Messing-Kennedy.
 From the kitchen of: Ashley Messing-Kennedy
dairy producer, Bad Axe, Michigan
Meatloaf was a comfort food for me growing up. This meatloaf takes comfort food and turns it into comfort food.
Bacon-Wrapped, Cheese-Stuffed Meatloaf
Adapted from here: The Slow Roasted Italian
Ingredients:
1 pound lean beef
1 cup Panko bread crumbs
1/2 cup milk
6 tablespoons ketchup, divided
1 tablespoon Montreal Steak Seasoning
1 tablespoon Worcestershire sauce
1 large egg
1 tablespoon brown sugar
8 ounces mild cheddar cheese, shredded
1 pound bacon, uncooked
Instructions:
Preheat oven to 350ºF.
In a large bowl combine beef, bread crumbs and milk, pouring milk directly over bread crumbs. Add 2 tablespoons ketchup, Worcestershire and steak seasoning. Set aside.
In a small bowl, crack egg and beat it slightly. This helps prevent overworking the meat while combining, resulting in a tougher meatloaf. Add egg to large bowl with meat mixture. Combine well with hands; do not overwork the meat mixture.
Gently press meatloaf into bowl and divide in half. Place first half into a 7-by-10-inch (or larger) baking dish and form into a flat meatloaf. Gently press the center in to create a rim around the outside of the meatloaf. Add shredded cheese into the center of the meatloaf.
Form the remaining half of the meatloaf in the bowl into a size similar to the meatloaf in the pan. Set on top and press the sides together to seal in the cheese. Form into a loaf shape about 1.5 to 2 inches tall.
You may notice cracks in the loaf. Run your hands under warm water and then across the meatloaf to smooth the cracks out. Set meatloaf aside.
In a small bowl, combine 4 tablespoons ketchup and 1 tablespoon brown sugar. Mix well with a fork. Apply glaze evenly all over the meatloaf (except the bottom).
Arrange bacon slices over the top of the meatloaf. Start by wrapping a piece of bacon across the front side and a second piece of bacon across the back side. Arrange remaining bacon over the top. Tuck the ends of the bacon under the meatloaf. (This prevents curling.)
Place meatloaf in the oven and bake until bacon is crispy, about 1 hour.
Remove from oven. Allow to rest uncovered for 20 minutes. Serve and enjoy.
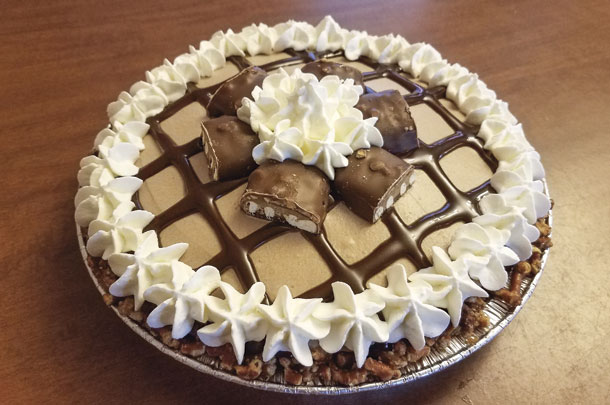
Photo by Karen Lee.
 From the kitchen of: Karen Lee,
editor, Progressive Dairyman Canada
When I was first asked to participate in the pie competition at the local fair, I wanted to create something unique. Using bits and pieces from other dessert recipes, I was able to incorporate the key ingredients from my favorite sweet and salty candy bar: Take5. The original recipe incorporated nondairy whipped topping, but now I use real cream instead, and I think it tastes even better.
Take5 Pie
For crust:
2 cups crushed pretzels
3 tablespoons sugar
3/4 cup butter, melted
For filling:
1/4 cup creamy peanut butter
1 cup cold milk
1 package (four-serving size) chocolate instant pudding
Chocolate whipped cream (see recipe below)
Extras:
Caramel sauce
Peanuts
Hot fudge
Whipping cream
Instructions:
Stir together butter and sugar. Stir in pretzels. Line bottom and sides of pie plate and bake 10 minutes at 350ºF, cool.
Place peanut butter in a large bowl. Gradually add milk, stirring with wire whisk until well blended. Add dry pudding mix. Beat 2 minutes or until well blended. (Mixture will be thick.) Stir in half of the prepared chocolate whipped cream.
Spoon into crust; let set about 20 minutes. Cover with a thin layer of caramel and peanuts; let set about 20 minutes. Top evenly with the remaining chocolate whipped topping.
Refrigerate 3 hours or until set. Before serving, drizzle or decorate with hot fudge and whipping cream. Store leftover pie in the refrigerator.
Chocolate whipped cream
8 ounces heavy cream
1/4 cup powdered sugar
1/8 cup cocoa powder
Sift together powdered sugar and cocoa. Add to cream in chilled bowl. Whip for 4 to 5 minutes until stiff peaks form.
From the kitchen of: Brittany Olson
dairy farmer, Chetek, Wisconsin
I tried making apple crisp recently with a streusel topping. I added a little too much butter to the streusel, and the end result was far better than we expected – a decadent, ooey-gooey cousin to apple crisp. It was very rich.
Serendipitous Apple Dessert
Ingredients:
1 quart apple pie filling, canned or homemade (doesn't matter)
Topping:
1 1/2 cups flour
2 sticks butter
1 teaspoon vanilla
Dash of cinnamon
Dash of apple pie spice
1/4 teaspoon salt (optional)
Shortbread base:
1 cup flour
1/4 cup sugar
1 stick butter
1 teaspoon vanilla
Instructions:
For the shortbread, cream butter and sugar before adding vanilla and flour. Press into an 8-by-8-inch pan and bake at 300ºF for 15 minutes. After removing from the oven, spread apple pie filling onto the shortbread. For the topping, cream the butter and sugar before adding dry ingredients and vanilla. Spoon the topping onto the pie filling and shortbread, and bake at 350ºF for 30 minutes or until the topping is golden-brown.
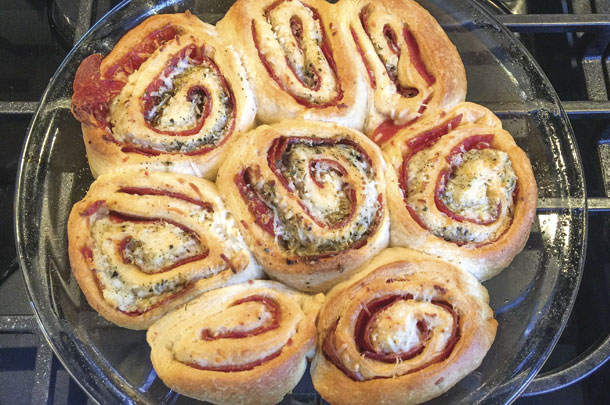
Photo by Emily Gwin.
From the kitchen of: Emily Gwin
editor, Progressive Dairyman
The way to my husband’s heart is through pepperoni rolls. At the beginning of the year, I tried out a “Pizza Roll Ups” recipe from my friend Renée Norman-Kenny, who blogs at www.eatfarmlove.com
After trying it once, I can tell you this is an awesome recipe to have in your quick meals arsenal. They come together almost as quickly as popping a frozen pizza into the oven, and the ingredients are easy to keep on hand.
And it was a slam dunk with both my husband and toddler daughter.
Pizza Roll Ups
Prep time: 10 minutes
Cook time: 12 minutes
Total time: 22 minutes
Author: Renée Norman-Kenny, Eat Farm Love
Serves: 6 servings
Ingredients:
1 tube (8 ounces) refrigerated crescent roll seamless dough sheet or crescent rolls
32 slices of pepperoni (I never have really counted; use your own judgment)
6 to 8 slices of ham
1 cup shredded mozzarella cheese
1/4 cup grated Parmesan cheese
1/2 teaspoon Italian seasoning
1/2 cup spaghetti sauce, warmed, optional
Instructions:
Heat oven to 375ºF. Spray 8-inch cake pan with cooking spray; you could bake on a cookie sheet, too.
If using crescent roll seamless dough, unroll dough and keep in one solid sheet. If using crescent rolls, press seams together so you have a full rectangle.
Place pepperoni and ham on top of dough and top with cheese. Sprinkle with Parmesan cheese and Italian seasoning.
Roll up jelly-roll style, starting with a long side, press edge to seal. Cut into 2-inch slices.
Place cut slices in greased 8-inch cake pan (similar to cinnamon buns). If using a cookie sheet, place 2 inches apart on a greased baking sheet. Bake for 10 to 12 minutes or until golden brown.
Serve warm with spaghetti sauce.
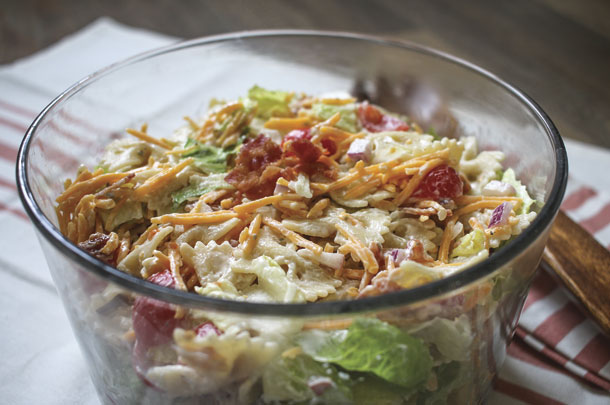
Photo provided by Renée Norman-Kenny.
 From the kitchen of: Renée Norman-Kenny
dairy producer, Enon Valley, Pennsylvania
Pasta salads scream summer, and what better way to celebrate June Dairy Month than with a pasta salad packed full of dairy. I love to serve this next to a delicious cheeseburger during a picnic lunch.
This pasta salad uses the classic BLT ingredients, but we step it up with the addition of cheddar cheese and ranch dressing. Whenever I can add more dairy, I sure take advantage of it.
It is easy to make in advance for a picnic or potluck and keeps for two to three days. I would suggest not making this pasta salad more than one day before your event because of the fresh lettuce.
BLT Pasta Salad
Prep time: 20 minutes
Cooking time: 10 minutes
Yield:8 servings
Ingredients:
10 slices bacon, cooked and diced
12 ounces bowtie pasta, cooked and cooled
1/2 cup mayonnaise
3/4 cup ranch dressing (can use homemade or premade; my homemade recipe on the right)
1 1/2 cup cherry tomatoes, cut into quarters
1 cup shredded cheddar cheese
1/3 cup red onion, diced
1 cup romaine lettuce, torn apart
Instructions:
Cook the pasta and bacon according to packages. Rinse the pasta with cold water to stop it from cooking and allow both to cool.
In a small bowl, whisk together the dressing, which consists of the mayonnaise and ranch dressing.
In a large serving bowl, place the pasta, tomatoes, cheese, red onion, lettuce and bacon.
Pour the dressing over and toss to combine.
Homemade Ranch Dressing
1/2 cup mayonnaise
1/2 cup sour cream
1/2 cup buttermilk or regular milk
1 teaspoon dried dill
1/2 teaspoon dried parsley
1/2 teaspoon dried chives
1/4 teaspoon onion powder
1/2 teaspoon garlic powder
Dash of salt and ground pepper
1 to 3 teaspoons white vinegar, adjust to taste
Whisk together all of the ingredients until smooth. Pour into a jar and chill in the refrigerator until ready to serve. I recommend at least 1 hour.
This dressing will keep in the fridge for one week. For best results, don’t skimp: Use full-fat products for the mayonnaise, sour cream and buttermilk. If dressing gets too thick, simply add additional milk or buttermilk until desired consistency is reached. ![]()


