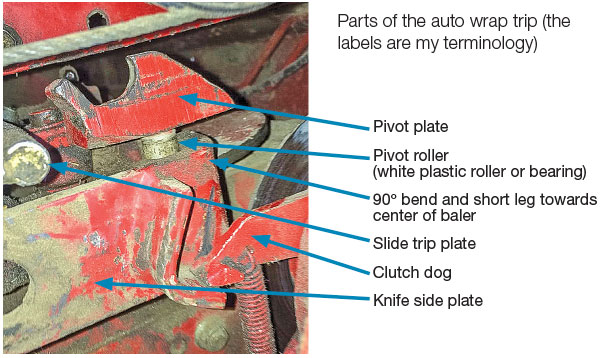
The auto wrap system is a mechanical operation, and if you understand how the process works, you can tackle repair jobs easier. Here’s how it functions.
As the bale grows, the take-up arm rotates. Attached to, or activated by, the take-up arm is linkage connected to the slide trip plate. The link could be a chain and cable, or link and cable, or just a link. As the take-up arm rotates, the linkage moves the slide trip plate forward until it contacts the back of the pivot plate. The pressure from the slide trip plate starts the pivot plate rotating.
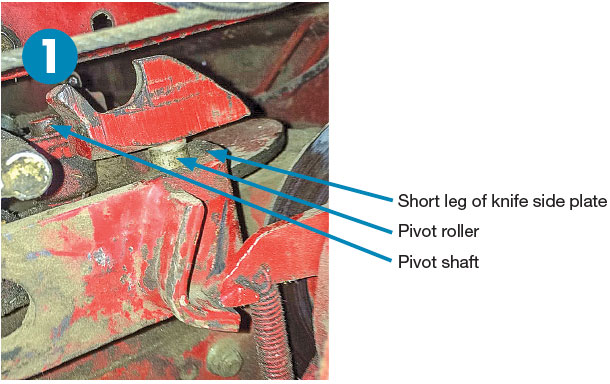
As the pivot plate rotates, the pivot roller rotates out from behind the short leg of the knife side plate. Once the pivot roller is no longer contacting the short leg of the side plate, a spring on the bottom of the knife side plate pulls the knife side plate down and opens the knives.
 When the knife side plate slides down, it releases the clutch dog and the tying cycle begins. The pivot plate rotates with the cam and, as the pivot plate comes back around, the pivot roller contacts the short leg of the knife side plate, pulling the knife side plate back up until the clutch dog contacts the angle welded to the side of the knife side plate.
The upward movement of the knife side plate causes the knives to close and the clutch dog to contact the angle and declutch the drive, stopping the tying cycle.
Cause No. 1 of repeat tying cycle
As the slide trip plate moves forward and contacts the pivot plate, the pivot plate rotates slightly, and the pivot roller will escape from the back side of the short leg of the knife side plate. Once free of the pivot roller, the spring at the bottom of the knife side plate pulls the knife side plate down, releasing the clutch dog, and the tying cycle starts.
 Since the pivot plate rotated on the pivot shaft, the pivot plate is no longer in the home position. There is a spring attached to the pivot plate, which pulls the pivot plate back to the home position.
If the pivot plate cannot rotate freely on the pivot shaft, the spring cannot pull the rotating pivot plate back to the home position, and the pivot roller will not be in position to contact the short leg of the knife side plate. If the pivot roller does not contact the short leg, the tying cycle will repeat.
To free the pivot plate, pull the cotter pin on the pivot shaft and remove the pivot plate, clean the parts and reassemble. Later balers have a grease fitting on the pivot plate.
Cause No. 2 of repeat tying cycle
As the rotating pivot plate reaches the end of the cycle, the pivot roller contacts the short leg of the knife side plate, pulling the knife side plate forward, closing the knives and disengaging the clutch dog, stopping the tying cycle.
When the pivot roller first contacts the short leg of the knife side plate, the pivot roller is in full contact with the short leg. Since the pivot plate is turning in a circular direction, the pivot roller starts to exit the short leg of the knife side plate.
As parts wear, and possibly bend, more of the pivot roller will be exposed from under the short leg of the knife side plate when the tying cycle is completed. Additionally, the pressure of closing the knives causes the knife side plate to push away from the roller.
It is also possible the pivot roller is missing and just the roller mounting shaft is contacting the short leg. Under these conditions, the pivot roller, or shaft, can slip past the short leg of the knife side plate, repeating the tying cycle.
My goal when adjusting the parts in this area is for the vertical center line of the pivot roller to be in alignment with the edge of the short leg of the knife side plate at the time the driving force of the clutch dog is disengaged.
There are a few ways to correct this problem. The knife side plate and slide trip plate are attached to a bracket bolted to the side of the baler with two or three bolts. There are spacers and washers between the auto-wrap parts and the baler frame. You can add washers under one of the bolts to cock the mechanism one way or the other.
I prefer to remove the knife side plate and straighten any bends in the long leg, bending the short leg so it is back to 90 degrees to the long leg. If you need more adjustment, then take a hammer and bend the long leg toward the pivot roller. Install the straightened plate and check the roller contact.
On some balers, you will not be able to see the roller and you will need to check the roller overlap by feel.
I have, in the past, also welded a bead to the end of the short leg to extend the short leg for proper contact with the pivot roller. If the pivot roller or bearing is missing, a new roller or bearing can be installed.
Important: Once everything is assembled and the auto wrap is disengaged, use the front handle to trip the auto wrap. If it is difficult or impossible to trip the auto wrap with this handle, then you have gone too far with your adjustment and too much of the pivot roller is covered by the short leg of the knife side plate.
The auto wrap must trip fairly easily or damage may occur. After any adjustment to the trip mechanism, trip the auto wrap by hand – checking how much force is required to trip the auto wrap.
After completing the process, you may notice the bales are slightly larger. That is because the slide trip plate needs to travel farther before the pivot roller is released.
Cause No. 3 of repeat tying cycle
The third cause happens rarely. If the auto wrap was working properly and then started repeating the tying cycle, then causes No. 1 and No. 2 should be checked first. The following is usually only done if the drive was disassembled.
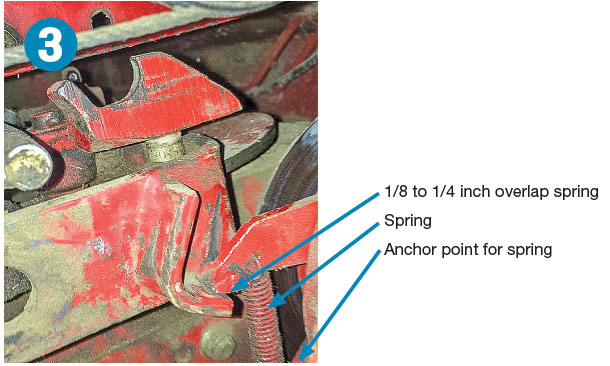
The auto wrap does have a timing procedure. When the clutch dog contacts the angle of the knife side plate and declutches, the dog should be on the angle by 1/8- to 1/4-inch. To get an accurate measurement, you will need to grab the leg the spring is anchored to and rotate the leg down to fully disengage the clutch dog.
To change the timing, remove the drive belt, remove the cotter pin holding the large front pulley to the shaft and remove the pulley. The clutch mechanism just slides on the splines of the shaft. Pull the clutch off and rotate one spline. Slide the clutch back onto the shaft.
You will need to realign the brake pad with the retaining bolts. At this point, you can loosen the brake to make the next step easier. Install the large pulley but do not install the cotter pin. Manually trip the auto wrap and turn the large pulley by hand through the tying cycle. (The reason I prefer turning the pulley by hand is to make sure the spring anchor leg clears the knife side plate angle.)
Repeat the steps as necessary to achieve the proper engagement. Instead of going through the complete tying cycle if the adjustment is not right, you can just rotate the clutch mechanism backwards, jump a spline and see if the overlap is right.
You still need to make a final check by turning the pulley through a complete tying cycle. If you loosened the brake, you will need to readjust it. Reassemble the auto wrap. ![]()
Mike Seckinger has over 44 years experience as a farm equipment mechanic in southern Indiana, and says, “What I write is not intended to represent the only way to solve a problem, and it may not always be complete. If you choose to follow some of my procedures, remember to always practice safety first. Wear the correct clothing and safety equipment and use the equipment’s safety devices.”


